1. INTERNET SPEED TEST:
2. PC WORLD - HOW TO?
https://www.pcworld.com/howto/
3.
How to delete Google from your life
Get rid of Google by deleting your account information and searching for alternative services.
https://www.pcworld.com/video/81295/how-to-delete-google-from-your-life
4. How to delete Facebook from your life
When it’s time to leave Facebook for good, do it by following these steps, and we'll also show you how to back out if you change your mind.
https://www.pcworld.com/video/81935/how-to-delete-facebook-from-your-life
5. How to get out of Windows Safe Mode
Safe Mode is a useful tool, but it's meant to be temporary. If your Windows computer is stuck in Safe Mode, these instructions will help get it out.
https://www.pcworld.com/article/3085034/windows/how-to-get-out-of-windows-safe-mode.html
Windows 8 and Windows 7 Safe Modes: How to enter and when to use them
And even in older versions, it’s not always the easiest form of entry.
Safe Mode gives you a low-resolution, visually ugly, feature-limited Windows environment useful for diagnostic and repair purposes. You wouldn’t want to create a PowerPoint demonstration there, but if things are misbehaving, it can be a fruitful place to visit. For instance, if a program’s uninstall routine keeps failing, it just might uninstall properly in Safe Mode.
[ Further reading: Our best Windows 10 tricks, tips and tweaks ][Have a tech question? Ask PCWorld Contributing Editor Lincoln Spector. Send your query to answer@pcworld.com.]
Among the things that standard Safe Mode cannot do is networking. However, because network and Internet access are needed for some diagnostic chores—such as malware scanning and updating drivers—Windows also provides an alternative Safe Mode with Networking environment.
The conventional way of entering Safe Mode still works in Windows 7 and Vista, and in some Windows 8 PCs. Boot the computer and start pressing and releasing F8 repeatedly. Once the Advanced Boot Options menu pops up, you can select Safe Mode or Safe Mode with Networking.
If that doesn’t work, here’s something specific to Windows 8:
- Hold down Shift while selecting the Restart option on the Shutdown menu. This works with the Settings charm and—in Windows 8.1—right-clicking
the Start button.
- On the resulting “Choose an option” screen, select Troubleshoot>Advanced options>Startup Settings>Restart.
- When the Startup Settings menu appears, type 4 for Safe Mode or 5 for Safe Mode with Networking.
Here’s one more path to Safe Mode, and it works in Windows 7, 8, and Vista:
- In the Start menu’s Search field or in the Windows 8 Search charm, type
msconfig, and launch the resulting program. - Click the Boot tab.
- Check the Safe boot option
- Select an option below that. Safe boot brings you to the standard Safe Mode. With networking does exactly what you think it does.
- Click OK, then Restart.
One problem with this method: When you’re done and you reboot Windows, it will take you back into Safe mode. So while you’re still in Safe Mode, launch msconfig and uncheck the Safe boot option.
https://www.pcworld.com/article/171753/computers/laptop-repairs.html
Easy fixes for six common laptop problems
Just follow our step-by-step guide.
Bet_Noire/iStock
We live and work in a cold, cruel world where our laptops can take a lot of abuse. Regardless of how gentle we try to be, our notebooks will probably be dropped, spilled upon or worse—sooner, if not later.
But if you think that all notebook damage can be repaired only by the manufacturer or a computer shop, think again. Many problems can be inexpensively and easily fixed with common tools, spare parts, and a little effort. Some repairs are no harder than high school art projects. That said, there are modern laptops that are very difficult to open and repair. If you can't see any screws, you're in for a tough time.
Using a couple of old, beat-up mainstream notebooks, we’ll show you how to fix everything from a broken case and frayed charger cord to a bad fan and scratched screen. Each restoration project has time and cost estimates, as well as what materials you’ll need to do the trick. Just follow the basic directions we’ve outlined for each repair.
[ Further reading: Our picks for best PC laptops ]Fair warning: Your system might be a little different, require special parts, or need a slightly different approach. YouTube is your friend.
One additional note: While we generally applaud improvisation and recycling old parts (especially AC adapters), there’s nothing like having the precisely correct part to do the repair. In fact, while fans and notebook keyboards may look similar, they can be very different. Each repair features links to where you can get the right parts, but they are just a sample of what’s available. If all else fails, try eBay, Newegg, Amazon, or CDW to get what you need.
Problem: Frayed AC adapter cord
Cost: $5 to $15
Time: 1 to 2 hours
Materials: Silicone sealant, painter’s
tape (which is less sticky than regular masking tape), protective gloves (optional)
Because a notebook that travels needs to be plugged in and unplugged several times a day, the cord and connector can take a beating, leading to a frayed or otherwise damaged power cord. If this happens, it’s important to get a new cord or fix it right away, because it not only can damage the system’s battery through intermittent charging, but it can also be a fire hazard.
Fortunately, many laptop power adapters have removable AC power cords, which cost a few dollars and are available online or at electronics stores. On the other hand, if the connector that plugs into the computer is the problem, it can cost $50 to $75 to replace if you opt for the exact AC adapter for your laptop from your notebook manufacturer, Amazon, or eBay (search for your make and model name followed by “AC adapter”).
Or you can just fix it yourself.
Brian Nadel/IDG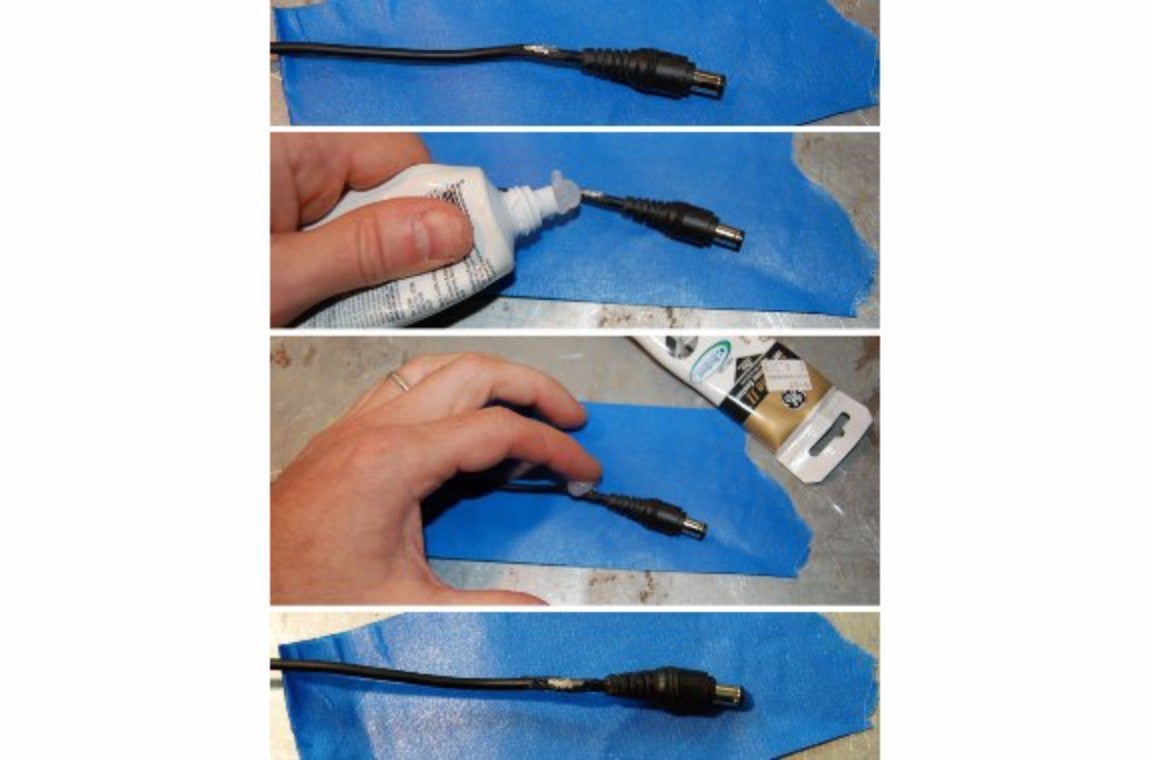
A frayed power cord can be dangerous. Apply silicone sealant to the frayed cord.
The quick-and-dirty repair for a frayed cord is to wrap electrical or duct tape over the damage. This prevents further damage, but over time will come loose—not to mention leaving that sticky gunk all over the cable when it does.
A better way is to make a more permanent repair with silicone sealant, available at any hardware store and many supermarkets, which will insulate and protect it. It’s best to use black to match the cord’s color, but clear sealant works just as well.
To protect the surface you’re working on, lay down a wide strip of painter’s tape, sticky side down, and place the frayed area of the cord on top of it. The sealant won’t stick to the back of the painter’s tape the way it might to other barriers made out of paper or plastic, and the painter’s tape should peel right off the table when you’re done. (Note, however, that you shouldn’t be doing any kind of computer repairs on your good furniture.)
Next, squeeze out a gob of sealant onto the area that needs fixing. Work the gooey sealant into place, covering the damage with a liberal coating. If you have sensitive skin, it’s a good idea to wear thin protective gloves for this part.
Let the sealant cure for an hour or two until it is firm. Gently remove the cord from the tape (and the tape from the table), and you have the equivalent of a new power cord that’s flexible and ready for years of road work.
Problem: Cracked laptop case
Cost: $15
Time: 2 to 3 hours (20 minutes
to set up the repair, 5 minutes to place and shape the putty, an hour or two to let it cure, 10 minutes to sand it, 30 minutes to paint it and let it dry)
Materials: Epoxy putty, sandpaper, razor blade, Sharpie marker or paint, gloves
(optional)
When notebooks get dropped, more often than not they land on the corner, one of the weakest parts of the case. Unless you have a ruggedized notebook, there’s a good chance that after an encounter with gravity, the corner will be cracked or—as was the case with my laptop—broken through completely.
It happened in an airport holding pen some time ago, when I sneezed while typing an email. The system went flying and smacked into the floor. Before I got home, I put a bandage over the damaged area to keep the elements out. Now it’s time to fix it for real.
The secret is to use epoxy putty to fill in the broken part of the case. Epoxy putty is available online or at any hardware store for around $4 to $6 a tube, so you can even do this repair on the road. The brand of putty you choose doesn’t matter, but avoid the quick-setting variety because it might harden before you’re done.
First, make sure the damaged area is clean and free of dirt and loose pieces.
Brian Nadel/IDG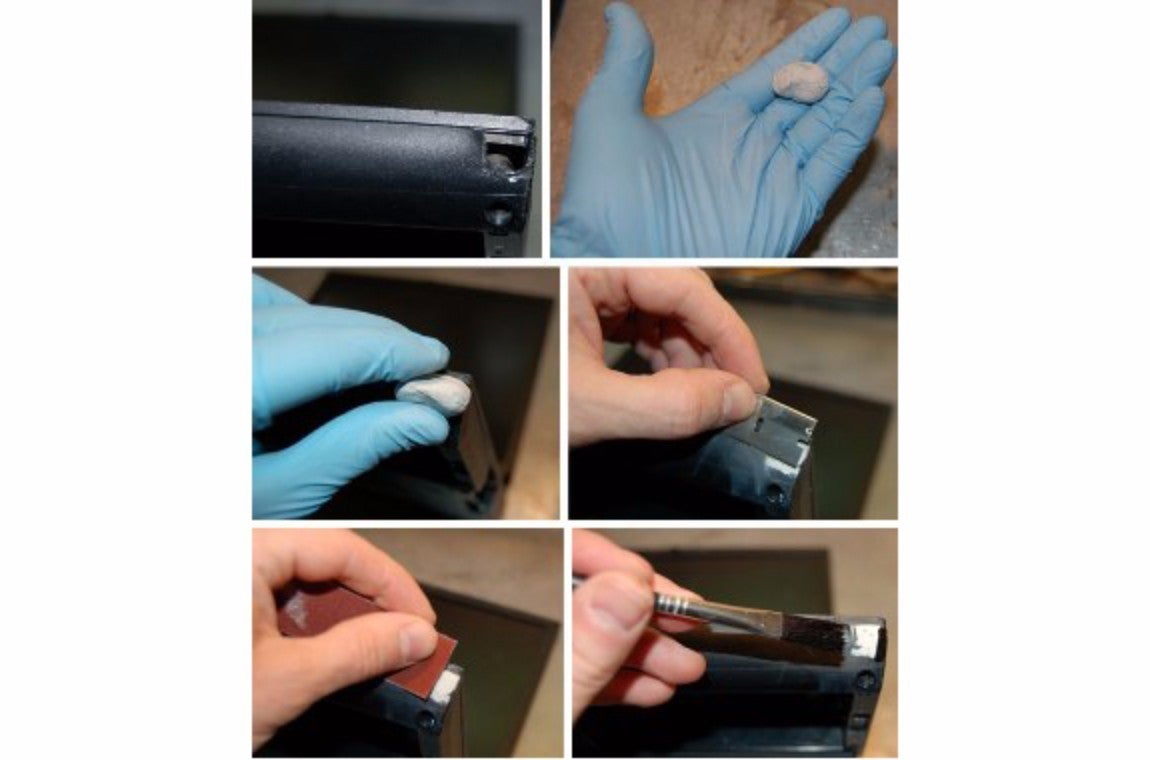
Putty, sanding, and trimming can fix a hole in a laptop case.
Then it’s time to prepare the putty. It comes as a cylinder with two components wrapped around each other. Just cut a section off and twist the parts together.
The key to a smooth case repair is to mix the two components together thoroughly in your hands. Because the putty hardens as the result of a chemical reaction between the two parts, it’s important that they are completely blended together. You might want to use gloves for this part, because some people are sensitive to the chemicals in the putty.
Try rolling the putty into a long cylinder and then folding it over itself several times. After a few minutes, the putty becomes a uniform white or gray, and you’re ready.
You’ll feel like a kid working with Play-Doh, and in fact, the putty should be the consistency of Play-Doh, which is perfect for working it into the damaged area. Press it firmly into the hole in the case and use your finger or a razor blade to shape it to follow the contour of the case. When it covers the area, take the flat side of a razor blade or back of a ruler and compress the outer surface to flatten it. Any excess putty can be wiped off the case with paper towel before it dries.
When you like the way it looks, go do something else for an hour or two until the epoxy is cured. When it has hardened, the epoxy patch is just as strong as the plastic case.
Many DIYers stop here, and use the obvious repair as a road warrior’s badge of honor or conversation starter on road trips. I prefer a little more finishing, so I smooth the epoxy with 150- and then 220-grit sandpaper. Then I give it a final sanding with 2,000-grit paper that is slightly wet to remove any surface scratches.
Naturally, the color doesn’t match. If it’s a small repair, try using a Sharpie marker to cover it up. For this repair, I used model airplane enamel paint, which costs about $5 for a small bottle (a full set of colors with brushes is $10). When it’s dry, the repair is done and visible only if you look closely.
Problem: Bad laptop fan
Cost: $15 to $25
Time: 1
hour
Materials: Screwdriver, compressed air, vacuum, replacement fan
A noisy or non-functional cooling fan is not only annoying but doesn’t bring enough cooling air into the case, potentially causing the notebook to overheat and damage the electronics inside. It’s not a hard repair to do, though, and if you’re lucky you may not need to replace the fan at all.
My laptop has a single cooling fan, although many systems, particularly larger gaming and entertainment systems, have two or more fans to circulate air over the processor, graphics hardware and hard drive. More often than not, the fans get clogged with dust, debris and dirt, which can make them noisy and lower their efficiency. If your system is making a whirring or grinding noise or is overheating, this repair is for you.
Before you do anything else, find the place(s) where fresh air comes in and hot air escapes—usually one or more slotted grilles on the side or bottom of the system. There could be two or three vents, so search thoroughly. Insert the plastic straw from a can of compressed air into each vent and blow out all the dust that you can. You might want to put on a dust mask or have a vacuum cleaner running, because there can be a disgusting amount of dust. Optionally, or additionally, you can try sucking things out with a canister vacuum cleaner.
If this doesn’t fix things, it’s time to dig deep and open the case. There are generally about a dozen screws on the bottom of the case that you’ll need to remove to open the case, but it varies widely depending on the notebook. For instance, some models require you to remove the keyboard to get inside. If it’s not immediately obvious, check your user’s guide or do some online research (again, YouTube is great for this stuff) to find out how your case opens.
Brian Nadel/IDG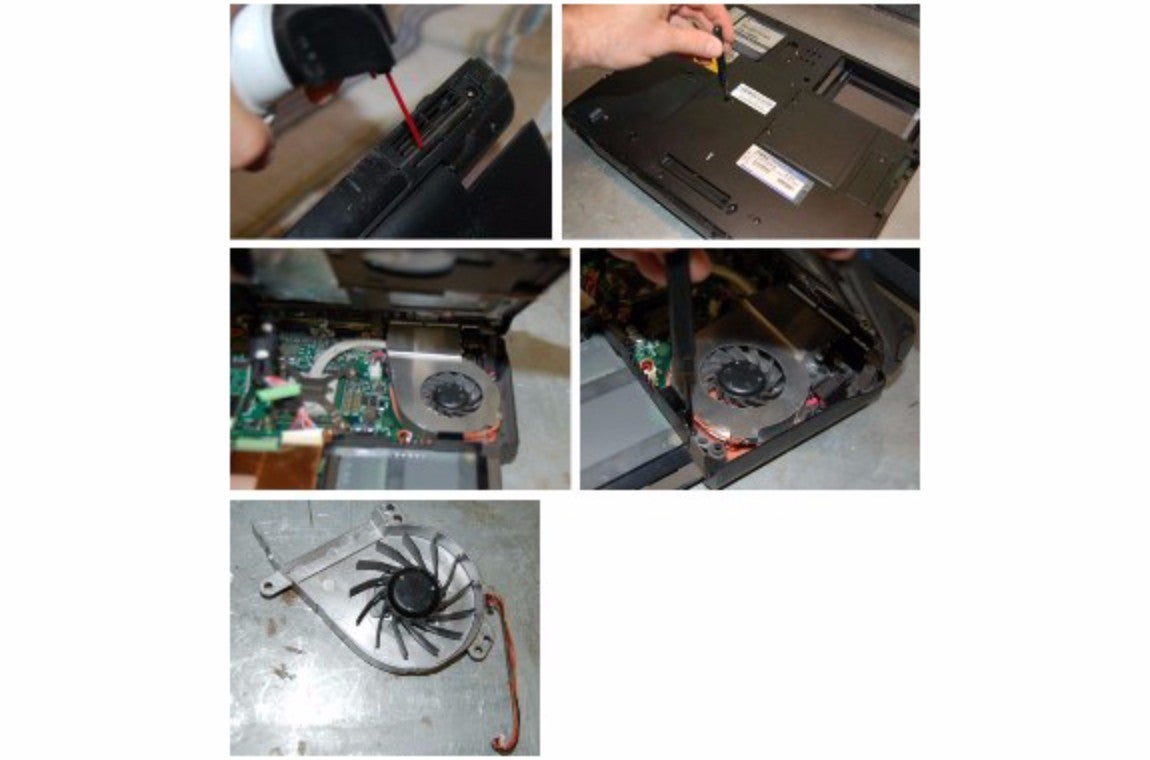
Blow compressed air into the slotted grilles. Open the case and remove any dust or detritus that impedes the fan. Carefully remove the old fan.
After carefully opening the case, find the fan and blow away any additional dust or detritus.
While you’re there, take a good look for anything stuck in the fan’s blades that might be impeding it. Twirl the blade with your finger. If it makes noise or doesn’t spin freely—as was the case with my laptop—it needs to be replaced.
Before going further, write down the model number of the fan and go online to find a replacement fan. Use your favorite search engine and type in the model number and “cooling fan.” Chances are that even for a five- or six-year-old computer, there will be fans available from eBay or the odd vendor. The replacement should cost anywhere from $5 to $20.
Once you have the new fan in hand (and are sure it’s the right one), you can take out the old fan. First, unplug the fan’s power connector. Each system is different, but you’ll probably need to unscrew a frame that holds the fan in place, and then undo some screws holding the fan to the frame. Again, the user’s guide or online videos are a great help.
Now you can gently remove the fan. It might take a little finesse to work the fan loose, because it’s generally a tight fit in there. Many notebook fans are connected to the heat pipe, a thin silver- or copper-colored tube that draws heat off of the processor or graphics chip. The heat pipe usually snaps or screws into the fan assembly. Try not to bend the heat pipe when you’re removing the fan, because that will reduce its efficiency at cooling the processor.
If for some reason, you go too far and can see the bare top of the CPU, make sure there’s adequate thermal paste. This is required to transfer heat from the CPU to the heat sink, and the lack of paste can also cause overheating issues. A tube costs a couple of bucks.
With the new fan ready to go, slip it in and carefully screw everything back in place. Before you screw the bottom of the case back on, plug in the power connector and fire up the machine. Don’t worry if the fan doesn’t start right away, because it may turn on only after the system heats up. Once you’ve verified that it’s working, close up the machine and get to work.
Read on for solutions for stuck keys, scratched displays, and sticky spills.
https://www.pcworld.com/article/171753/computers/laptop-repairs.html
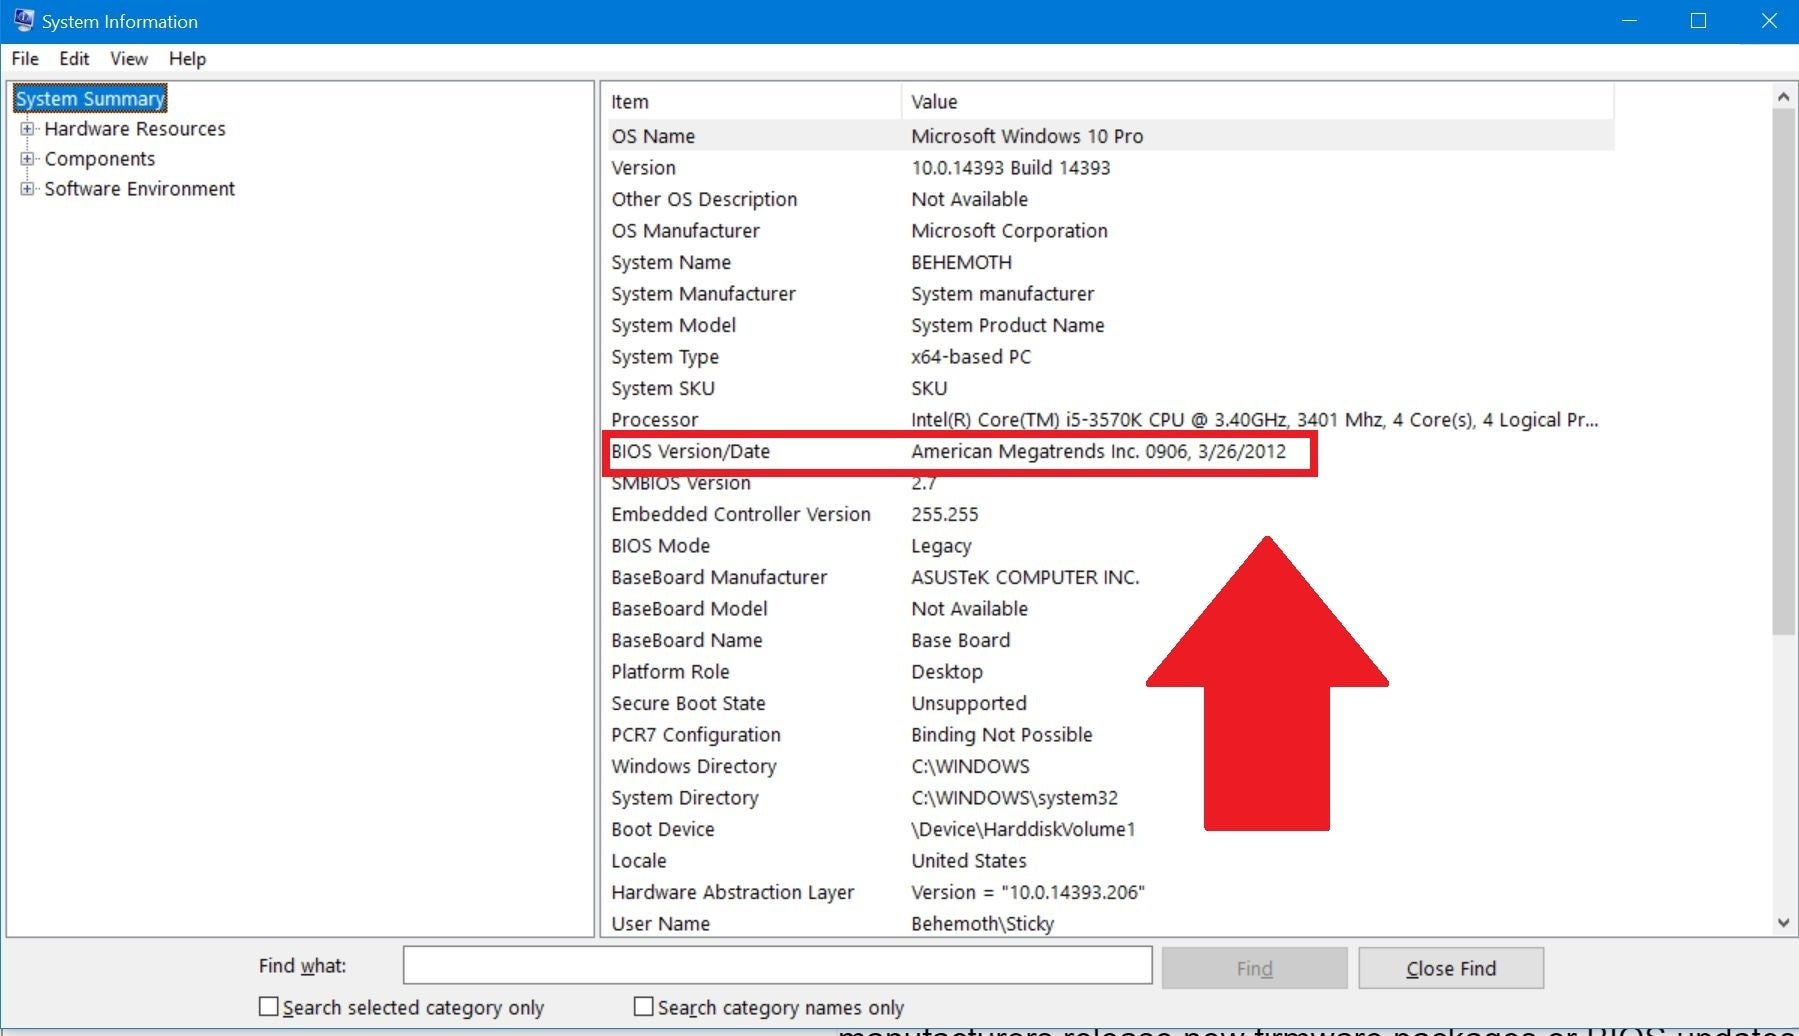
https://www.pcworld.com/article/187437/software/how-to-update-your-bios.html
Brad Chacos
A tiny BIOS chip lurks inside every computer, sitting on your motherboard to breathe life into your system when you press the power button. It not only powers your PC, but helps protect it, too—as Duo Security's recent report on Apple macOS attacks points out
BIOS stands for basic input and output system, and the BIOS chip initializes all the other devices in your PC, like the CPU, GPU, and motherboard chipset. But a few years ago, motherboard manufacturers—in partnership with Microsoft and Intel—introduced a replacement for traditional BIOS chips dubbed UEFI (Unified Extensible Firmware Interface).
Almost every motherboard shipping today has a UEFI chip rather than a BIOS chip, but they both share the same core purpose: preparing the system to boot into the operating system. That said, most people still call the UEFI the “BIOS” because of the familiarity of the term.
[ Further reading: Your new PC needs these 15 free, excellent programs ]Why you should (or shouldn’t) upgrade your BIOS
Understanding your UEFI is important so you can understand how (and if) to take advantage of the feature updates and bug fixes that come with the BIOS updates offered by motherboard manufacturers.
Brad Chacos
New chip and motherboard platforms often receive numerous BIOS revisions early in their lifecycle, to work out bugs.
Your motherboard likely uses whatever firmware revision that the motherboard manufacturer was on back when it was built. Over the lifespan of a motherboard, manufacturers release new firmware packages or BIOS updates that will enable support for new processors and memory, or solve commonly reported bugs. For years, the only real reason to update to a newer firmware revision, however, is to solve a bug in your UEFI or to swap in a CPU that’s newer than your motherboard.
What the Duo report points out, though, is that attacking the UEFI firmware is now a bleeding-edge attack. It’s so low-level, it probably won’t be detected by antivirus software. And once in there, chances are it could survive even refreshing your PC. While it's true that Duo's report focuses on the Apple Mac platform, PCs are vulnerable, too. In April, attackers showed how a UEFI exploit could be used to inject ransomware into Gigabyte PCs.
Some people like to regularly check for and update their UEFI firmware packages just to stay up to date. At one time, this was considered a risky practice, given that the firmware updating process can potentially brick your motherboard in the same way that flashing a custom ROM on to Android phone can brick the device. It’s best not to update your UEFI firmware unless there is something specific that the updated firmware offers that you need.
That said, you probably want to stay on top of BIOS updates if you’re on a chip or motherboard platform that’s fresh out of the gates. Several motherboard BIOS updates were released over the first week that AMD’s disruptive new Ryzen chips were in reviewers’ hands, and each provided additional performance and system stability. Expect for those to continue as AMD works the bugs out of Ryzen.
How to upgrade your PC BIOS
When you boot up your PC, you’ll see text that informs you which button to press to enter the UEFI BIOS. Press it! (The exact button needed, and the design of every motherboard’s actual UEFI control panel differs, so these instructions will be more guideposts than step-by-step instructions.)
Although not all motherboards offer this feature, on certain models you can boot into the UEFI control panel and use a built-in update utility to connect to the Internet and flash the latest firmware from the manufacture’s server. This extremely nice feature makes updating to newer firmware revisions as painless as possible.
Brad Chacos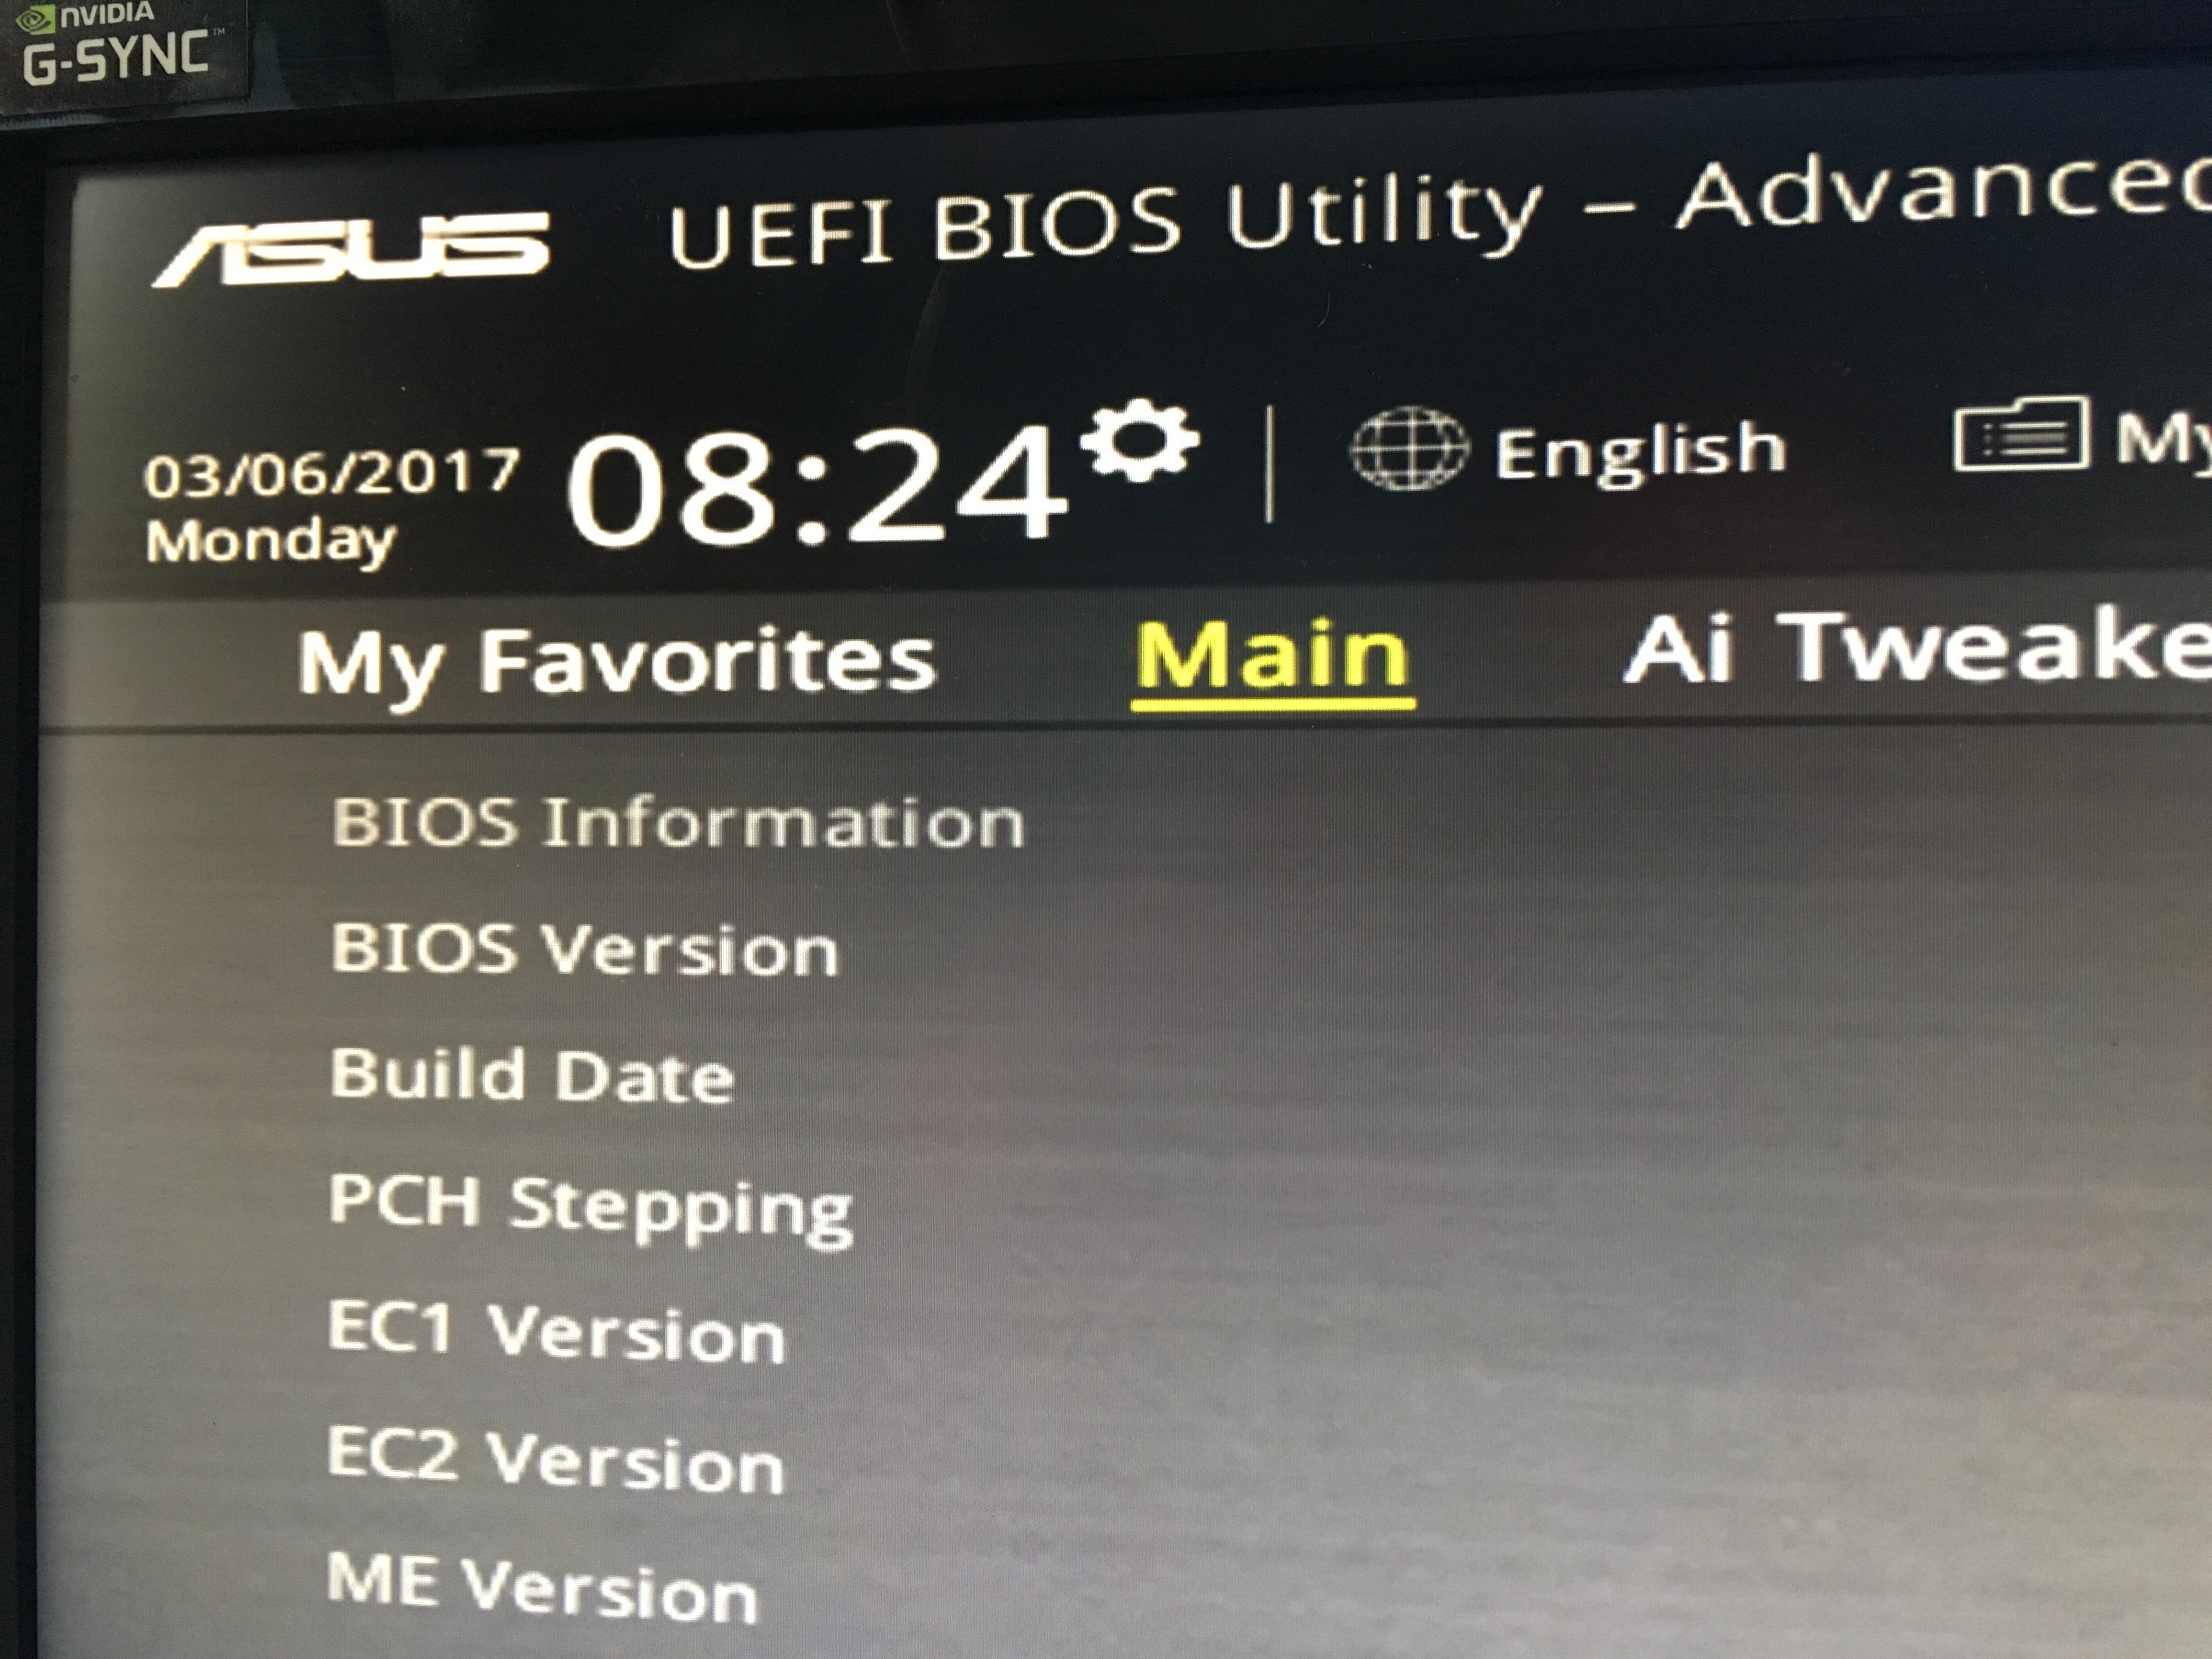
The process is a bit more involved for motherboards that don’t support this feature. First you’ll need to find your motherboard’s support page on the manufacturer’s website. The latest BIOS update should be in the support and downloads section. You’ll need to download and unzip the file, dump it onto a USB flash drive, and reboot your computer into the UEFI control panel.
From there, you’ll need to launch the UEFI’s firmware update tool or flashing tool and back up your PC’s existing firmware to your flash drive—just in case something goes wrong. Then use the same UEFI utility to select the new firmware image you downloaded from its location on the flash drive. Running the firmware update utility should take just a couple of minutes, but make sure not to shut off your PC during this process. This is critical.
Once the flashing process finishes, restart your computer and your updated PC BIOS is ready to rock.
Some manufacturers offer utilities that can update your UEFI chip from directly inside Windows by running an .exe file, but we strongly recommend using one of the two methods above to avoid any problems.
Again, updating your PC’s BIOS can provide many benefits, but it’s important to understand the risks. Don’t touch it if there isn’t a clear, compelling reason to update your UEFI firmware. That said, if you want to drop in a newer CPU into an older motherboard, then it’s clear that a BIOS update lies in your future.
Updated at 10:46 AM to reference Duo Security's recent report on UEFI attacks on the Apple Macintosh and MacOS.
How to fix your Wi-Fi network
https://www.pcworld.com/article/260524/networking/how-to-fix-your-wi-fi-network-7-tips.html
How to fix your Wi-Fi network
Wi-Fi problems? This troubleshooting guide will help.
- Wi-Fi router cheat sheet
- Wi-Fi basics
- Can’t see a network you know is available
- Connected, but no internet access
- The IP address is valid, but nothing loads
- Your network connections are inconsistent
- Correct password, no connection
- Your device repeatedly rejoins the wrong network
- Your adapter could just be dead
Wi-Fi router cheat sheet
Our quick-hit picks:
- Best Wi-Fi system: Netgear Orbi RBK50
- Best budget Wi-Fi system: TP-Link Deco M5
- Best Wi-Fi router for smart homes: Samsung Connect Home
In this article, I look at a number of common scenarios that cause Wi-Fi problems and how to solve them, whether you’re running your own network or trying to connect to someone else’s using any platform.
Wi-Fi basics
Before we get started, a very quick primer on a few Wi-Fi terms I’ll bring up repeatedly.
802.11: the name of the IEEE engineering trade group’s working group for wireless local area networks (WLANs). WLANs began in earnest with 802.11b in 1999 (802.11a came out at the same time, but had less traction), and the group is all the way up to 802.11ac and 802.11ad today. We expect to see 802.11ax gear announced at CES. These specifications define how data is encoded into radio transmissions and exchanged among devices.
Wi-Fi: a trademarked name used to cover network adapters that have passed a certification test to work with each other using various 802.11 specifications.
Wi-Fi AllianceThe Wi-Fi Alliance awards this logo to products that meet its interoperability standards, but its absence on a product’s packaging could just mean the manufacturer didn’t want to pay for the testing and certification.
Channels: Frequency bands are divided into numbered channels. In the U.S., 2.4GHz has 11 available overlapping channels numbered 1 to 11, while 5GHz has about two dozen scattered across a broader range from 36 to 165. They run in groups for historic reasons in how the bandwidth was granted for unlicensed use to everyone. (5GHz channels are numbered at least four apart, as in 149, 153, and 157, for reasons too involved to explain.)
Can’t see a network you know is available
You know a network should be reachable from where you’re at, but it doesn’t show up in your list of available networks to which you can connect. Try these possibilities:
- This is a good time to check whether you disabled Wi-Fi without realizing it. Some Windows laptops and other devices have hardware Wi-Fi switches or buttons that you can press by accident. In Windows 10, the network icon will show a red X through the Wi-Fi in the taskbar. In macOS, the Wi-Fi “fan” in the system menu bar will be an empty outline.
Some computers have buttons that can turn the onboard Wi-Fi adapter on and off.
- Cycle your Wi-Fi adapter. On many devices, you can choose a software setting to disable the Wi-Fi radio temporarily. Airplane Mode is the simplest way in operating systems that offer it, though using it disrupts cellular and Bluetooth connections on your device as well.
- Out of range. Wi-Fi doesn’t have a hard cutoff as to when it will work and when it won’t. Sometimes you can get perfect reception in one place and then later not. That’s because the radio signals bounce off surfaces, pass through walls, and can be absorbed by people and materials. Move around and see if the network shows up.
- Check your band. While many user devices can connect using either frequency band, you can still find modern hardware that can only connect via 2.4GHz. If you happen to be in a place where the only available signal that reaches is a 5GHz network, all your dual-band hardware will connect just fine, but single-band 2.4GHz gear won’t. Because of the different characteristics of the band, it’s possible to be in a room in a house, office, or public space where a 2.4GHz signal doesn’t reach, but the same base station’s 5GHz signal is crisp and clear. The Apple Watch in all its versions supports only 2.4GHz Wi-Fi. Older and inexpensive smartphones and tables may lack 5GHz radios, too, and many smart home products have only 2.4GHz support.
- It’s a closed network. While it’s never been a truly valid way of improving security, some networks are set up so that they don’t broadcast their name. In that case, if you don’t have a connection profile stored, you must use the method in the operating system to join a network manually, often listed as “Other” in a menu. You’ll need to enter the name precisely and, if it’s using encryption, choose its security method and enter the password.
- The network is down. Check from multiple devices or ask other people using the network. A router may need to be rebooted—or replaced.
Connected, but no internet access
Wi-Fi is just a radio technology, which means you can have a perfectly strong signal and a valid connection, but still lack network access.
Start by checking your network address and see if it’s in the “self-assigned” range. If there’s something wrong with the way the local network assigns out addresses to devices as they attach, your computer or mobile device will create a self-assigned address, which can’t route data elsewhere. In some cases, small networks can run out of addresses to assign!
Microsoft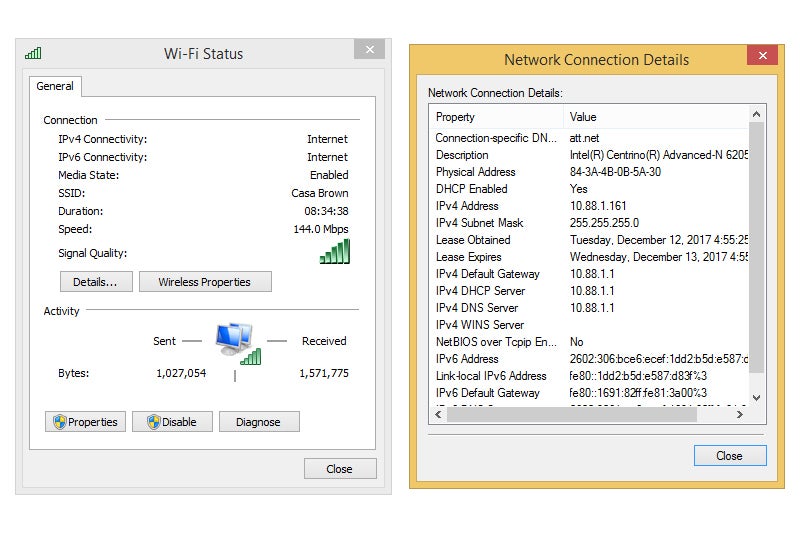
Check the IP address assigned to your device to ensure that it has an address assigned by your router.
Some operating systems provide a clue that there’s a problem, like the Wi-Fi signal adapter showing an exclamation point in it. In others, you’ll need to drill into network status or settings.
- In Android: Settings > About Phone > Status.
- In iOS: Settings > Wi-Fi and tap the “i” info button.
- In Windows: Settings > Network & Internet and then choose the Wi-Fi adapter.
- In macOS: Open the Network system preference pane, select the Wi-Fi adapter, click Advanced, and click the TCP/IP tab.
If the IP address on your device for IPv4 networking (a set of four numbers separated by periods) starts with 169.254, then it’s a self-assigned address, which indicates your OS couldn’t receive an assignment from the local network’s DHCP (Dynamic Host Configuration Protocol) server. (Some work and academic networks might require entering a static set of values, but you should know if you’re on one of those.)
Before assuming the network is at fault, however, check your firewall settings, if you have one installed or are using tools built into the OS. Some firewalls prevent connecting to new networks and routing traffic over them without an explicit entry. In most cases, you should receive a prompt that warns you about a new network and asks you approve it. But depending on your configuration, it’s possible the network routing has been blocked silently.
Once you eliminate the firewall or other filters, you can be sure it’s the network that’s the trouble. If you’re not the person who kicks routers when they misbehave, you’ll need to find someone who is.
The IP address is valid, but nothing loads
If you’re using a public hotspot at a café, airport, conference center, or elsewhere, you might have run afoul of a portal or login page without realizing it. Most operating systems’ last several versions understand that you might encounter a portal and act accordingly. Until you answer the right questions or click the right buttons, internet access is locked away.
With a portal page, the hotspot effectively hijacks domain name service (DNS) lookups, so that everywhere you’re trying to go redirects to the portal. Apple’s macOS and iOS recognize this behavior, and pop up a modal dialog that displays the portal webpage. Once access successfully starts, the OS can tell that DNS is working properly and dismisses itself or shows a Done button that can be tapped or clicked.
Sometimes portals are wonky or, due to firewall or other filtering software, your system doesn’t trust these redirections. This would prevent the portal page from appearing.
Open a browser and try to load any page, like cnn.com, and see what happens. If you see loading and redirection start—look at the Location field in your browser and see if the domain or IP addresses change—it’s likely something on your system that’s blocking completion.
If nothing ever loads in the browser, consult with the venue. You may need to obtain a password, pay, or use a special configuration.
Ookla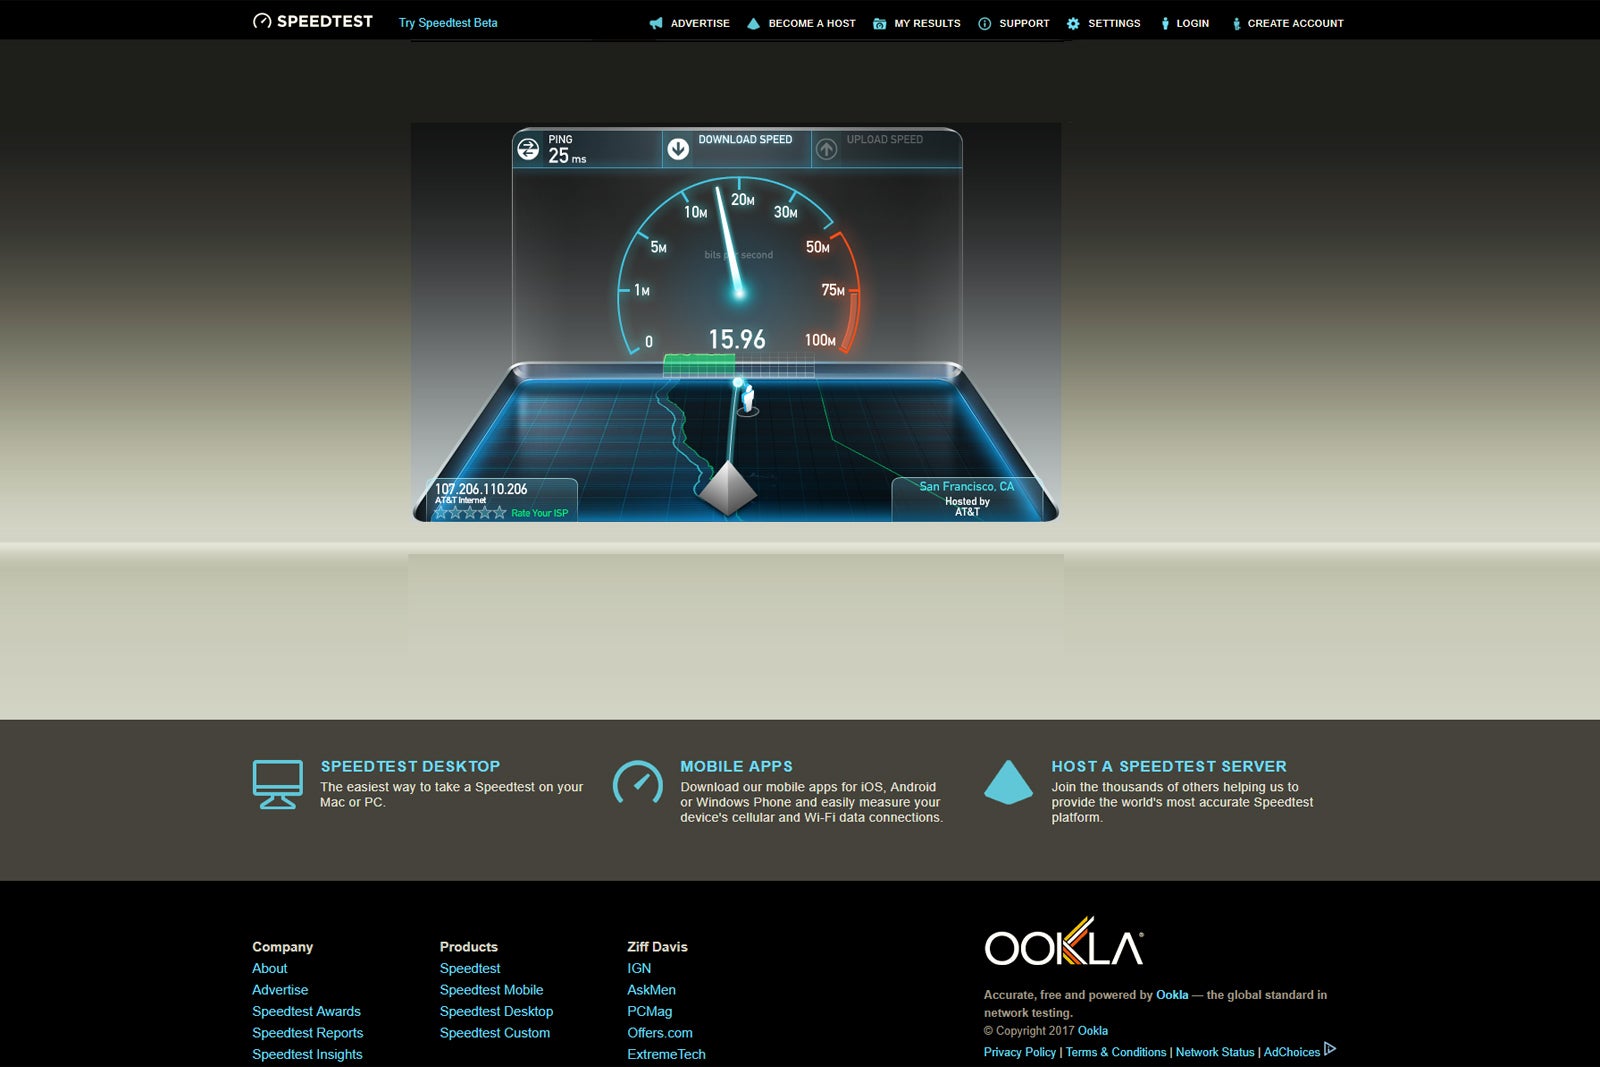
Speed-test tools like Ookla’s Speedtest.net can measure the speed your broadband ISP is providing, but you should test with a hardwired connection whenever possible.
Your network connections are inconsistent
There are four main culprits in inconsistent Wi-Fi performance and network access: an erratic broadband connection, distance from a base station, the wrong base station in a set selected, and a congested local networking environment.
- Broadband. The first is hard to test unless you can plug an ethernet cable into the router and use a bandwidth tester, like one from Ookla, or a network monitor that shows you performance over time. If you can, however, eliminate that as a possibility before you move forward.
- Distance. This seems like an easy one, too: move closer! But if you don’t know where the Wi-Fi base stations are located or you’re in rooms away from those in which they’re placed, “closer” may be hard to figure out. Because of signal reflection and absorption, it’s not always obvious where to move your own base stations for better coverage. NetSpot ($49 for the Pro version for Windows and macOS; there’s also a feature-limited free version) can help you visualize your coverage area by building a heat map as you walk around. There’s also a free version of Ekehau’s Heatmapper that provides similar features.
- Wrong base station. A network of identically named Wi-Fi routers with the same security settings lets you roam, whether in a million-square-foot office tower or across rooms in your house. The device you’re carrying, however, doesn’t always make the right choice about the strongest signal. In my small house, we have three base stations due to thick walls. Laptops and mobiles routinely stay connected to a router in the basement when they’re within feet of one upstairs. You can pick which base station to join when they’re all named the same, but cycling your Wi-Fi adapter from on to off to on typically causes it to make a better choice.
- Congested local network. If you’re at home or in an office where you run the gear, you may be able to improve the Wi-Fi situation around you. Outside of mesh networking ecosystems, you can typically connect to a Wi-Fi router and switch from the default automatic channel assignment in each band to choosing a channel. A little secret about Wi-Fi is that while the signal levels have a single maximum for all channels in 2.4 GHz, the 5 GHz band is divided into three major pieces, and until 2014, each of them had a different maximum signal limit. The lowest channel range (36, 40, 44, and 48) could only operate at no more than five percent of the maximum of the highest channel range (149, 153, 157, and 161, typically). Setting your 5GHz band to channel 149 solves that if you have equipment that wasn’t revised to reflect the new rules, which is the vast majority of base stations that are at least two years old. (You can use a tool like WiFi Explorer [$20] to examine what’s in use around you.)
- One extra tip: Force 5GHz. Many base stations default to naming the separate 2.4GHz and 5GHz networks the same to ease roaming. Most of them, however, also let you choose a separate name for each. If you want to ensure the fastest connection with the highest signal strength, having separate 2.4GHz and 5GHz network names helps alleviate the inconsistency you might experience as a result of connecting to the crowded 2.4GHz brand.
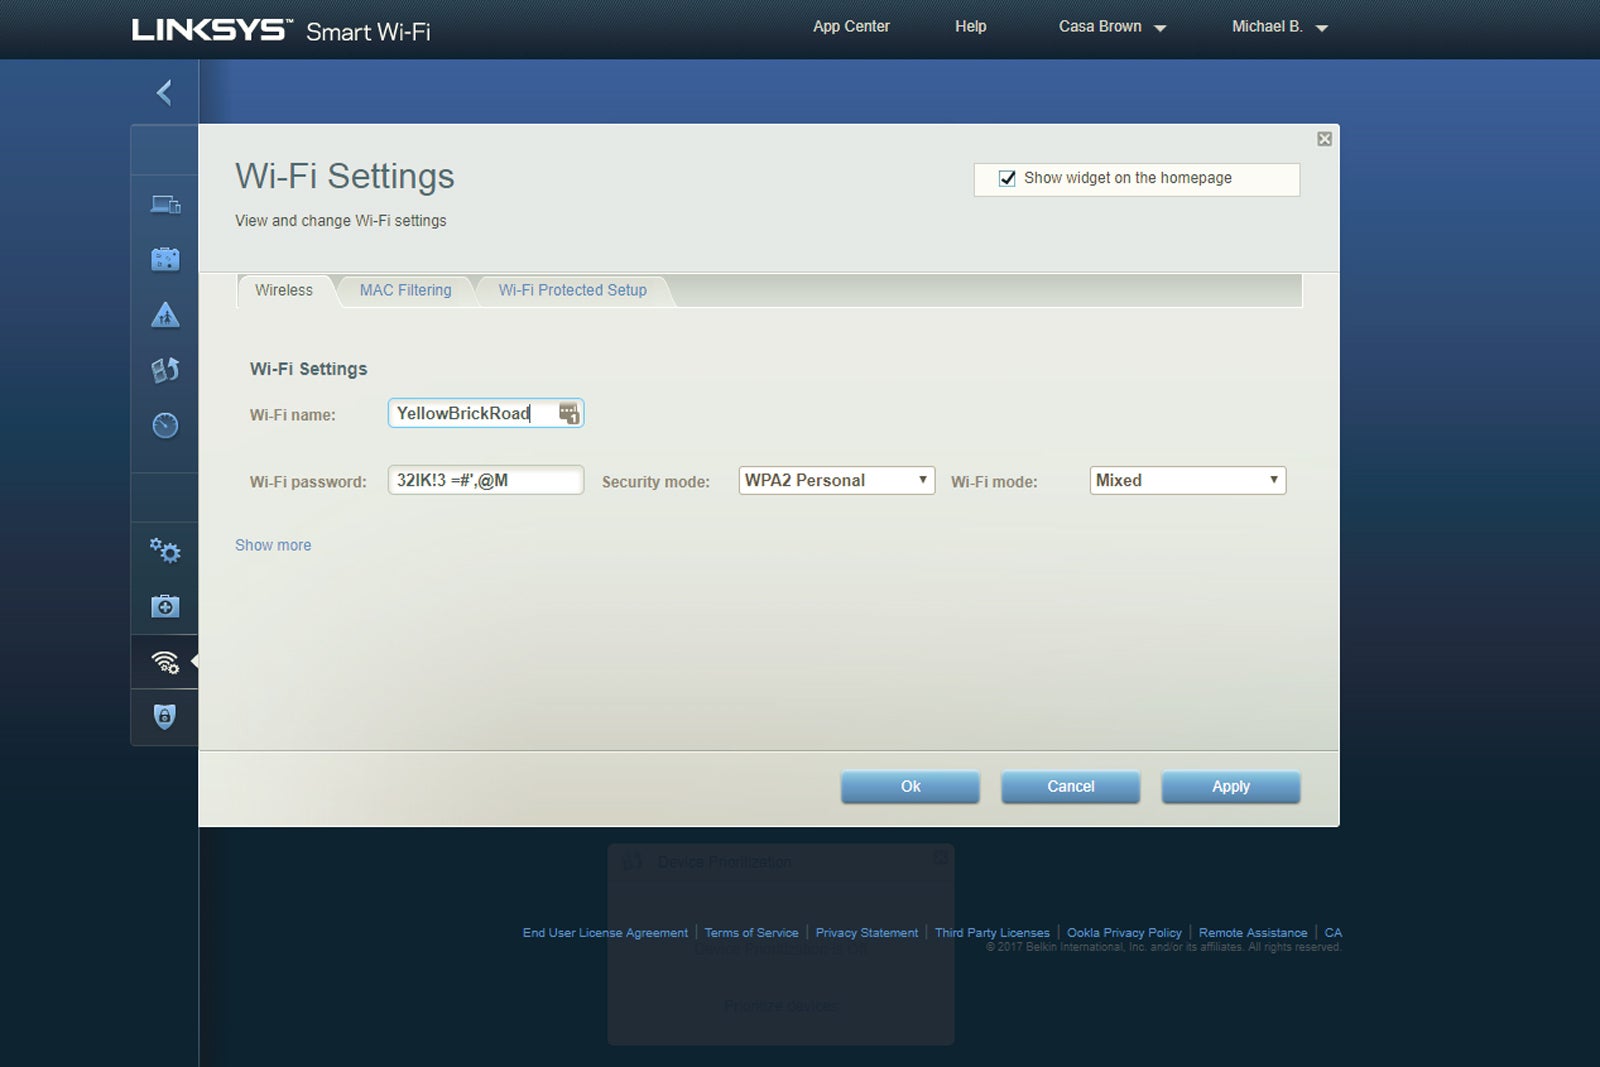
It’s always a good idea to use a complex password, but they can be difficult to communicate to others. Many modern routers, including the Linksys Velop router shown here, let you share them via text message.
Correct password, no connection
A network that requires either a password or a username and password will reject your device if you enter it improperly. But what if you’re positive you’re entering the password or username and password absolutely correctly?
- Check whether you were given the password with correct capitalization, which counts in Wi-Fi passwords as in others. Spaces can be part of WPA2 passphrases, but spaces are hard to indicate when written down. Confirm you’re not missing a space.
- Make sure you’ve selected the correct network. In some places, you’ll be contending with dozens or more separately named networks, and you may have selected one named similarly to the one you want. Some businesses and hotspots run guest networks named only slightly differently than their internal, private networks.
- Overloaded networks and routers with firmware that’s malfunctioning might reject a connection, even when you’ve entered the password properly. Consult with the network’s operator—if that’s you, reboot the router!
Your device repeatedly rejoins the wrong network
Most modern operating systems retain a list of every network to which you’ve connected ever. My Mac has entries that date back several years across several machine migrations. Some ecosystems sync access, too, so when you join the network on one device, all your other phones, tablets, and computers now can join without additional effort.
Microsoft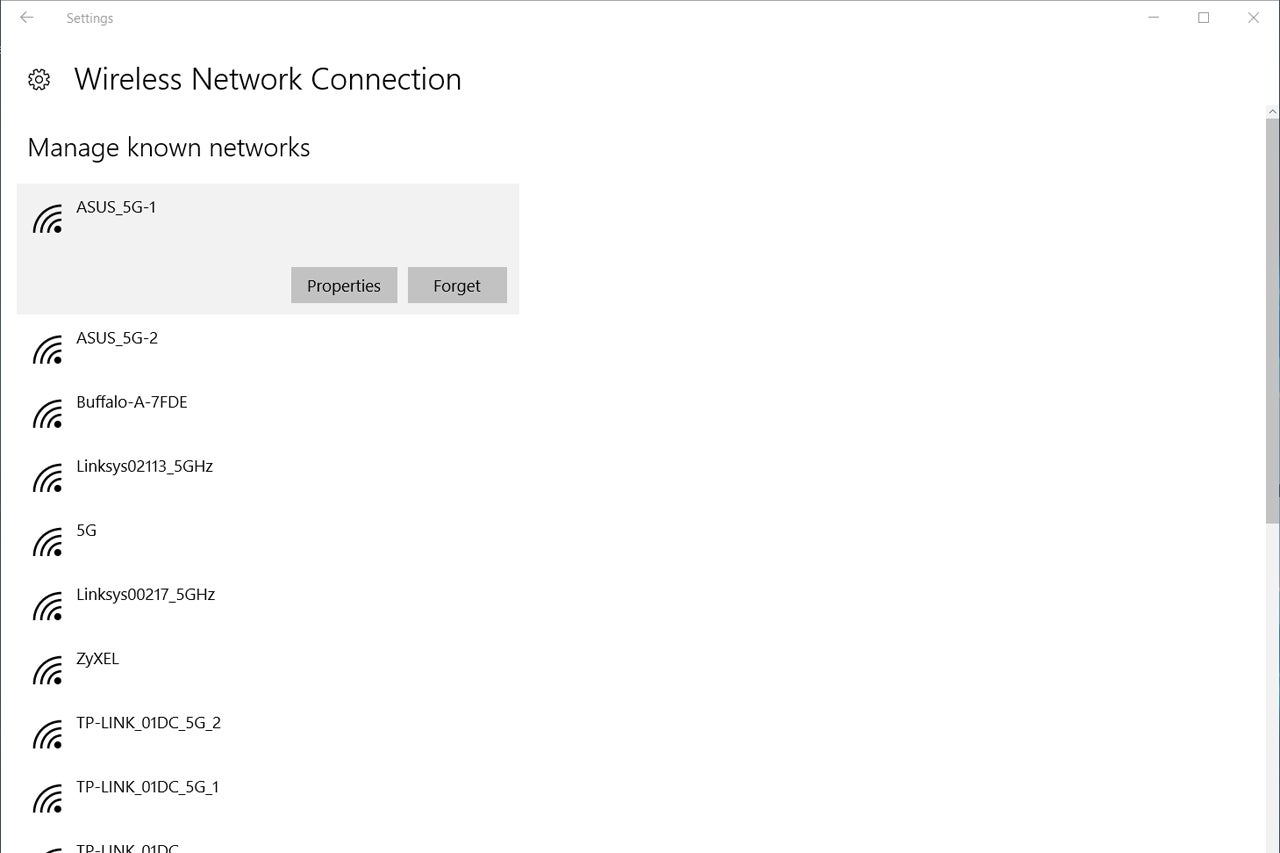
Windows 10’s Manage Known Networks setting will show you every network your computer has ever joined (unless you’ve told it to forget some of them). If you know there are networks you’ll never need to connect to again, click on each one and select Forget.
If you find a flaky network in a place you work or visit routinely that you’ve joined once, you might have tried to forget it, but it remains. I’ve seen this and heard from readers that deleting a network connection doesn’t fully remove it, because a synced copy elsewhere gets copied back to your device! The trick is persistence: keep deleting it from every device you’re using so the syncing finally syncs up.
You can manage networks in each OS after navigating to these locations:
- Android: Settings > Wi-Fi, tap the Customize button and choose Saved Network.
- iOS: In Settings > Wi-Fi, you can only forget the currently connected network.
- Windows: Click the Network icon, choose Manage Wi-Fi Settings, and then choose Manage Known Networks.
- macOS: Open the Network system preference pane, click the Wi-Fi adapter in the list at left, click Advanced, and then click the Wi-Fi tab.
Your adapter could just be dead
Wi-Fi adapters can just die, no matter what kind of device they’re embedded in. Before giving up, reinstalling the OS can be a final ditch way to see if it’s a corrupted driver rather than broken hardware.
With a computer, you can purchase a cheap USB nub that plugs in and offers compatible service. With mobile phones and tablets, they may be unrepairable. As I was writing this article, a friend had just returned from the Apple Store with a phone that had its Wi-Fi access go flaky and then fail: the store said it couldn’t be fixed, only replaced.
Note: This story was originally published on August 9, 2012. It has been completely updated with current information on Wi-Fi networking.
How to set up your new computer
https://www.pcworld.com/article/3040361/computers/how-to-set-up-new-computer.html
Set up antivirus, clear out bloatware, and perform other tasks to keep your PC humming well into the future.
Adam Patrick Murray
So you’ve got a new computer. Awesome! That humble metal box is the key to a wide world of potential. It can help you with everything from juggling your finances to keeping in touch with your family to blowing off some steam on, uh, Steam.
But a new PC isn’t like a new car; you can’t just turn a key and put the pedal to the metal. Okay, maybe you can—but you shouldn’t. Performing just a few simple activities when you first fire it up can help it be safer, faster, and better poised for the future. Here’s how to set up a new laptop or desktop computer the right way, step by step.
Run Windows Update on your new PC
The first step is by far the most tedious. You shouldn’t muck around on the web unless your copy of Windows is fully patched and up to date, period. Now for the bad news: Depending on how long your PC sat on the retail shelf, this could take minutes—or hours. Either way, it has to get done.
Brad Chacos/IDG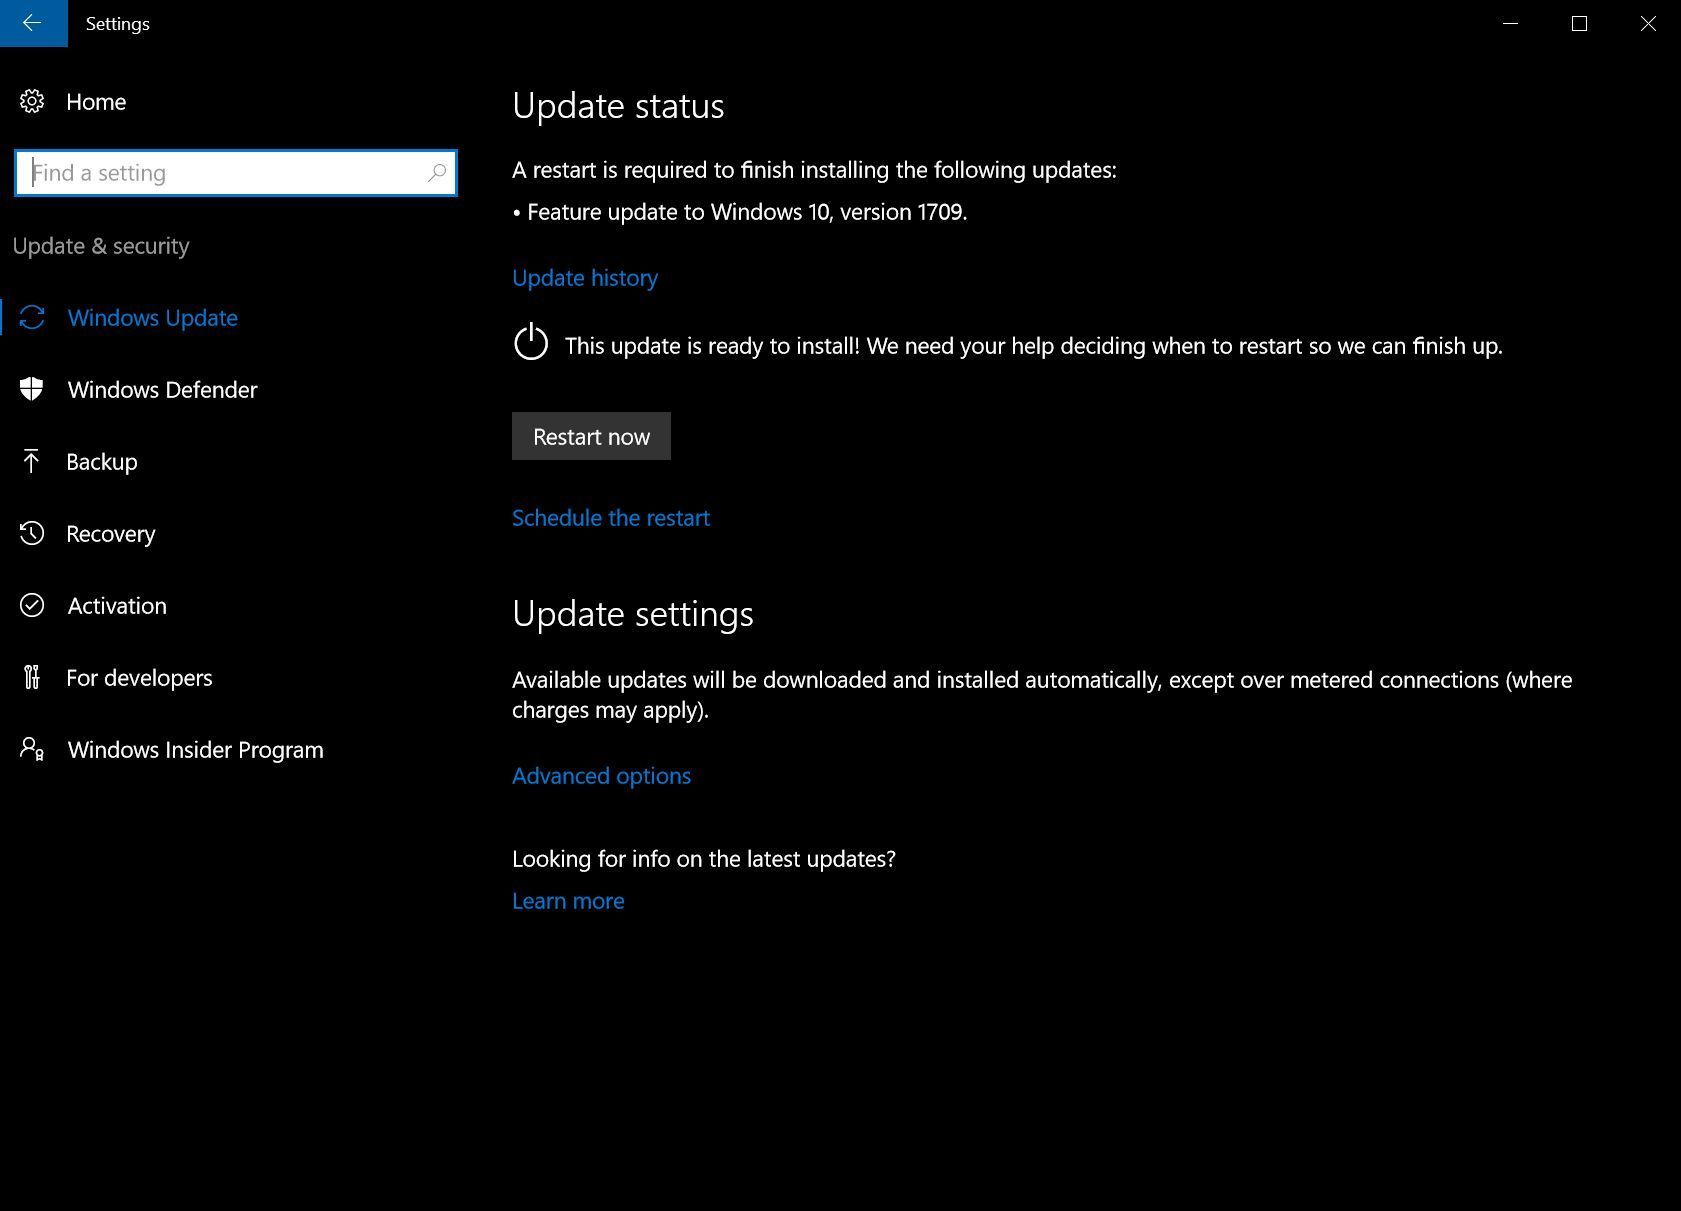
Windows Update in Windows 10.
First, make sure your PC’s connected to the Internet. In Windows 10, open the Start menu and head to Settings > Update and security > Check for Updates. Your system will search for updates, and find some. Download and install them, then reboot your computer and do it again… and again… and again… until the update check fails to return new entries. Hopefully it won’t take too long, but in worst-case scenarios updating a new computer can take an hour or more.
On the bright side, Windows 10 will download and install new updates as they roll out in the future. You just have to get over this initial hump!
Install your favorite browser
Surfing the web in an unfamiliar browser is like trying to tango while you’re wearing someone else’s shoes. It can be done, but it ain’t pretty. Here are direct links for Chrome, Firefox, and Opera if Edge isn’t your thing.
Chrome has been our go-to pick for years, but after Firefox's exhaustive overhaul in 2017, the duo share top honors in PCWorld’s best browser showdown. If your tastes lean more exotic, you could always dabble with one of these 10 obscure, highly specialized browsers, too.
Set up your new PC's security
Now that you’ve slipped into something more comfortable, it’s time to get your security ducks in a row.
IDG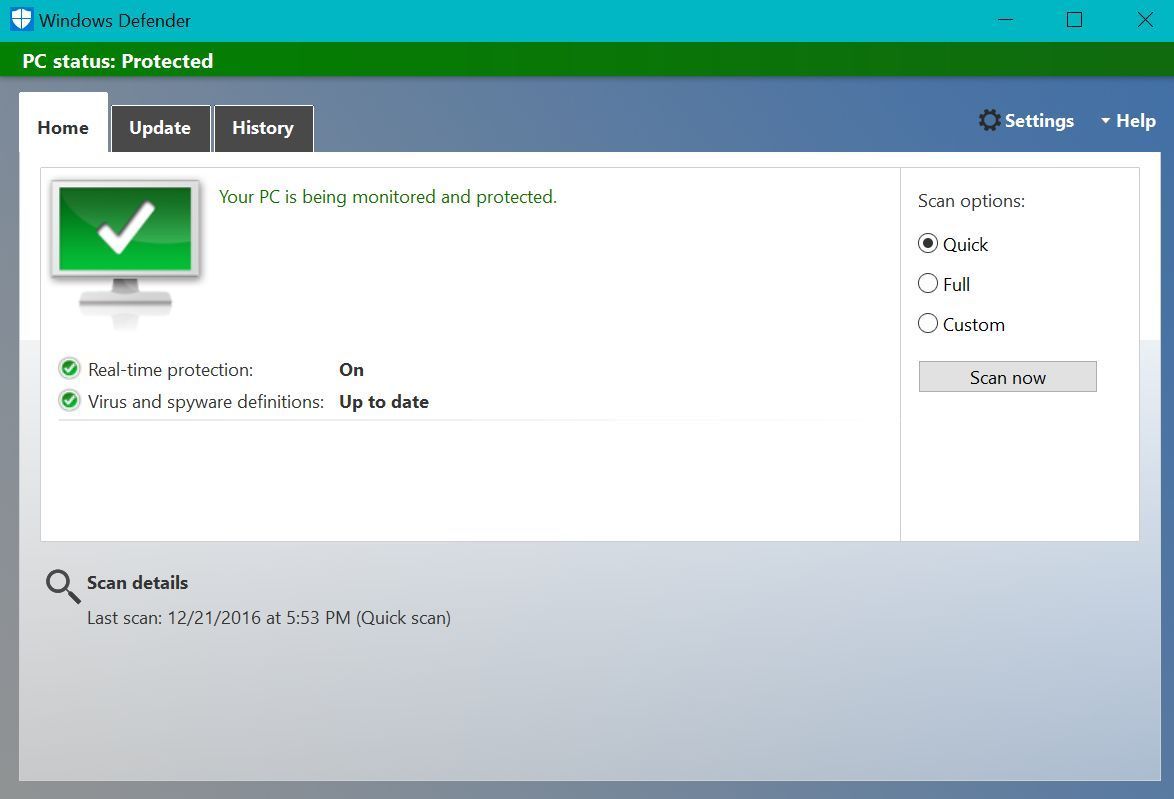
Windows Defender in Windows 10.
Windows 10 ships with Windows Defender enabled by default unless your laptop or desktop includes a third-party antivirus trial. Defender is a solid, if not overly detailed security solution that’s dead-simple to use and probably good enough for most people. It isn't the most full-featured anti-malware solution out there, though. You can’t even schedule scans! PCWorld’s guide to the best antivirus for Windows PCs can help you find all the right tools to keep your PC protected.
We also have a guide to building a solid free security suite, but it takes more legwork and hassle than premium antivirus options.
Clean your computer's bloatware
With your defenses up, it’s time to start shoveling the crap out of your PC.
You can skip this step if you built your own Windows PC—including installation of the operating system—or bought a “Signature Edition” computer from a Microsoft store. Straight Windows installations don’t come with excess junk cluttering up your hard drive. But boxed PCs from big-name PC makers are inevitably brimming with bloatware.
Fortunately, there’s PC Decrapifier, a straightforwardly named tool that scans your PC for known bloatware, then allows you to wipe it all away in one fell swoop. It’s far faster than hunting through the Control Panel, eradicating crapware piece by piece. Better yet, it’s free.
PC Decrapifier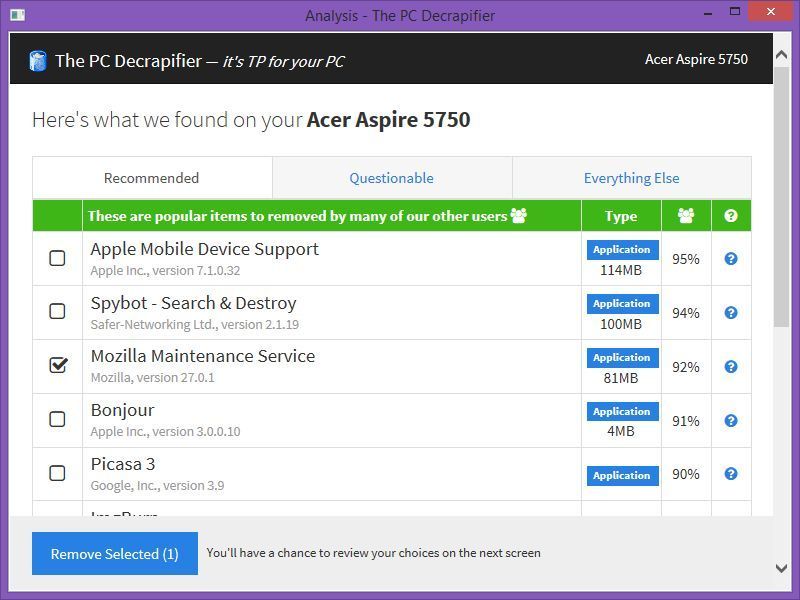
PC Decrapifier.
Most people should stick to PC Decrapifier, but there’s an even more thorough cleansing available only for people who feel comfortable reinstalling their entire operating system.
If you’d rather nuke everything from above Microsoft also offers a downloadable tool that installs a clean copy of the most recent version of Windows 10 Home or Windows 10 Pro but without any apps that aren’t part of Microsoft’s default Windows 10 setup. It seriously doesn’t mess around, as Microsoft drives home in the tool’s description: “Using this tool will remove all apps that don’t come standard with Windows, including other Microsoft apps such as Office. It will also remove most pre-installed apps, including manufacturer apps, support apps, and drivers.”
This tool will wipe out any product keys or digital licenses associated with that software too, so if you want to keep some of the software being blasted away (like Office, say), be sure to jot down the product key before using Microsoft’s fresh start tool, using something like Belarc Advisor to find it.
Fill your new computer with software
Why’d we scrape all that junk out? To make room for your own stuff, silly. New hardware just begs for software to match!
Outfitting your rig is an intensely personal affair, but if you’re looking for suggestions, PCWorld has a guide to the best free programs that are so helpful, so handy, so downright useful that they’d be welcome on pretty much any PC. These review roundups can also guide you towards some of the best software around:
- The best free Microsoft Office alternatives
- The best password managers
- The best free PC games
- The best PDF editors
- The best VPNs
Head towards Ninite when it comes time to actually install all that software. Ninite is sort of like an anti-PC Decrapifier—it lets you install numerous free applications of your choice all at once, even going so far as to automatically disable the bundled crapware that many free programs try to sneak in as part of the installation process. It’s a wonderfully handy tool that takes the pain out of loading up a new PC.
Back up your new computer
After all that, your PC is finally ready to rock: It’s safe, up to date, scrubbed free of junk, and full of software fine-tuned to meet your specific needs. The end is in sight! But we’re not done juuuuuust yet.
Now that your PC’s in fighting shape it’s an ideal time to create a clone or image of your primary hard drive—the one Windows boots from—and save it to another hard drive. A clone or image creates a snapshot replica of your drive, which you can use to boot up Windows if your primary drive gives up the ghost. Having an image of your system in its current updated, bloatware free, customized state prevents you from having to do all that legwork over again if you ever have to reinstall Windows for any reason.
THE BEST WINDOWS BACKUP SOFTWARE
So what’s the difference between a clone and an image? Essentially, a clone creates an exact copy of your hard drive on another drive—files, master boot record, and all. The clone consumes the entire hard drive, but it’s plug-and-play if you ever need to use it. Images, on the other hand, create a single, mammoth file containing all the stuff on your PC. It takes a bit more work to get an image backup ready to roll after a disaster, but you have more flexibility in how you store it, since it’s essentially just a great big file. Lincoln Spector has a more detailed comparison if you’re interested.
There are excellent backup tools available that let you create clones and images, which we cover in detail in PCWorld's roundups of the best Windows backup software and best online backup services. If you don't mind performing more technical gruntwork to save some cash, we explain how to use Windows’ native imaging tool step-by-step in PCWorld’s guide to creating a free, foolproof backup system. Use something though. Regular backups are your data’s only savior if disaster strikes.
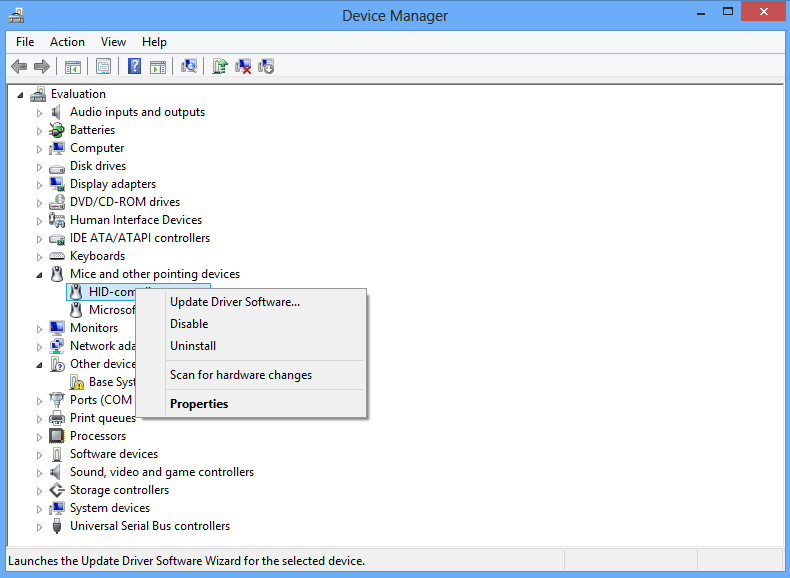
Optional: Update your new PC's drivers
This step isn’t for everyone. Few things can introduce troublesome ghosts in your machine faster than a driver that refuses to play nice for whatever reason. If your from-the-box desktop PC is working fine and you only ever plan to perform basic tasks like surfing the web, working with Office, and stuff like that, feel free to forget your computer even has drivers and keep on keeping on. Windows Update should’ve snagged reasonably new drivers for your hardware anyway.
You’ll spend some time staring at the Device Manager if you built your own PC and need to update your drivers manually.
GAMERS SHOULD KEEP GRAPHICS CARD DRIVERS UPDATED
But if you cobbled together a DIY rig or are rocking a gaming machine, it’s a good idea to see if newer drivers are available for your hardware. Windows Update isn’t always on the bleeding edge of driver updates, and new drivers for, say, your motherboard or network card can provide beneficial feature and performance updates. Gamers will need to update their graphics card drivers fairly often to ensure optimal performance in the newest games.
PCWorld’s guide to updating your Windows drivers has all the info you need to proceed. It was written for Windows 8, but if you search for Device Manager in Windows 10, all of the same steps outlined in the article still apply. If a driver does somehow manage to bork your PC, fear not, as Windows automatically creates a System Restore Point when you install new device drivers.
And if true disaster strikes in some bizarre, extreme case, you’ve got the backup image you’ve created—right?
Optional: Learn about your new computer
Now that all the hard work is done, take time to learn all the nooks and crannies of Windows 10—there’s an awful lot of surprisingly powerful, downright helpful tools and tricks hidden in its depths. PCWorld has guides on the best Windows 10 tips and tricks, a plethora of power tools for enthusiasts, and less flashy fresh features that eliminate everyday headaches. Bookmark them all and browse through them at some point. You’ll pick up a lot of helpful knowledge.
Wrap-up
At this point you’re pretty much ready to roll. Sure, there are some other tasks you should perform, such as moving over files from your old PC and saving the product keys for Windows and your other installed software (again, Belarc Advisor rocks for that), but you can do all that at your leisure. For now, just bask in the glory of owning a new PC, secure in the knowledge that it’s fully optimized, protected against attack, and recoverable if disaster strikes.
Enjoy! And if you’re migrating over from a previous computer, be sure to check out PCWorld’s tips for breathing new life into an old PC and 10 shockingly cheap PC upgrades. Just because a machine’s being retired doesn’t mean it’s junk.
How to Repair a Corrupt Windows 7 Installation
https://www.pcworld.com/article/243190/how_to_repair_a_corrupt_windows_7_installation.html
Wiping your hard drive and performing a fresh installation can be a huge headache; but fortunately there's a way to repair a corrupt Windows 7 installation while keeping all your programs, personal data, and user accounts intact. With Windows 7 you can perform an in-place upgrade installation to repair a flaky existing install. Though technically designed to upgrade older Windows operating systems like Vista, the in-place upgrade installation option can also be used to repair an existing installation of Windows 7.
The in-place Upgrade installation involves multiple stages, starting with copying installation files to the destination drive and gathering existing files and settings.
[ Further reading: Our best Windows 10 tricks, tips and tweaks ]
Note that you must perform the in-place upgrade process from within Windows; if your PC can't fully boot to the Windows desktop, this repair guide is not for you. A few other limitations come up later in the article, so be sure to read the entire guide thoroughly before attempting to repair your corrupt copy of Windows 7. Performing a repair installation should be your last resort, and you should consider it only if you have already removed spyware from your PC, reinstalled your drivers, and unsuccessfully tried to restore from an earlier (working) version of Windows 7 using System Restore.
Prepare Your PC for Windows 7
Before performing a repair installation, you should take a few precautionary measures to ensure that the process goes smoothly. The first step is to back up all of your critical files to an external storage device. Though the repair process is unlikely to fail or to render any of your files unrecoverable, it's always a smart idea to back up your data.
After you've backed up your system's important data, we recommend uninstalling any third-party security software such as firewalls or antivirus applications. You can always reinstall them after completing the repair process; but since you'll be initiating this process from within Windows, you need to remove any security applications that actively scan files. You should also download and store all of the drivers that your system needs to function--especially the network controller, which tells your network adapter how to access the Internet.
After backing up all of your drivers, clean out all of the temporary files and junk data that have accumulated in Windows 7 over the course of prolonged use. To do this, click the Start button, and in the Search field type Folder Options; then press Enter. In the Folder Options window, click the View tab and select Show hidden files, folders and drives; then click OK.
Next, initiate a Disk Cleanup by opening the Start menu and selecting Computer; right-click your primary drive (the C: drive by default) and open the Properties menu. Select the Disk Cleanup utility in the lower-right portion of the menu, and select Clean up system files. The Disk Cleanup utility should take a few moments to rescan the drive. Next, click the More Options tab, and select Clean Up in the 'System Restore and Shadow Copies' section at the bottom of the menu. In the dialog box that appears, click the Delete button; then navigate back to the Disk Cleanup tab, confirm that all items in the Files to Delete list are checked, and click OK. The Disk Cleanup utility should clear out outdated system files, temporary data, and other digital detritus. Depending on how much junk data is on your drive, this step may take anywhere from a few seconds to a few minutes.
After running the Disk Cleanup utility, you should clean out a few folders manually. Open the C: drive again, and double-click the Windows folder. Scroll down the list of folders and delete any files in the Prefetch and Temp folders. Be sure to delete only files within those two folders and not the folders themselves. Next, navigate back to the C: drive, and double-click the Users folder. Within the Users folder, double-click first the folder for your particular username, and then the AppData folder (if you don't see the AppData folder, you must not have selected 'Show hidden files, folders and drives' earlier), the Local folder, and finally the Temp folder. Delete all of the files in this Temp folder as well; then restart your system.
https://www.pcworld.com/article/243190/how_to_repair_a_corrupt_windows_7_installation.html
PC hardware repair. Must watch basic but important.
LearningZone
Published on Jun 29, 2014
Here is the hardware repair for Asus desktop PC.
build your own computer has it own benifits. computer laptop are following Computer desktops. gaming desktop is very expensive sometimes. custom pc can be made with little cost. all in one desktop is a PC having everything in them. dell computers are expensive compared to others. computer monitor have their own place. all in one computers are a bit expensive than others.
desktop pc is also common now a days. best buy computers
all in one pc are available everywhere today. pc desktop and computer price are going down. best desktop computer and laptop sale is going on. computer desktop and laptop computers and all in one computers are sold today. pc computers are not very common. computers for sale are available on every shop. cheap computers are there on pc shop. computer parts are expensive. computer hardware and software are there for all in one desktop
computer sales have high value. new computer and pc laptops can be sold. notebook computer are not very common. best computer
cheap pc and computer tower can be purchased. computer accessories are small parts. computer shop and computer system are same. my computer and computer laptop are sold here. pc store and pc kaufen are Ibrahim Otaibi kaufen. tablet laptop and computer kaufen are together. refurbished computers and refurbished laptops are sold on all shops. used laptops have their value. computer portatile and buy laptop in used computers and second hand laptops are there. gaming desktop are cheaper. new laptops and acer computers are expensive. laptop reviews are available on internet. build your own computer is easy. custom pc can be made with common hardware. hp computers are good. mini computer are also used sometimes. computer case are beautiful. best pc can be made. build a computer is not difficult. computer components are available. laptop comparison can be made. compare laptops on website. computer memory sticks are cheaper. laptop tablet are small computers. gateway computers and pc online are big computers. about computer and computer history. pc parts are hardware. desktop computer deals. cheap desktop computers are all around. best desktop pc can be made. desktop computers for sale is available. desktop computer price are going high. desktop pc deals can be made. cheap desktop pc and desktop deals. best desktop is here. buy desktop computer on computer deals. cheap desktop are good. desktop pc sale and desktops for sale are better choice. all in one desktop computer are not very good. new desktop computer is better than old. desktop computer sale at home computer. latest computer are there on desktop sale shop. best desktop computer deals are made today to buy computer. top desktop computers and pc deals. pc for sale and desktop price for windows desktop computer. discount laptops and price of computer is low. pc sales and computer buy are both good. buy pc at discount computers. laptop computers for sale at computers on sale shop available. laptop pc and computer towers for sale are there. pc price is going high with computer cpu quality. computer pc are there. cheap computers for sale are available. personal computers and pc system at best home computer. buy computer online is a good choice. computer warehouse and used desktop computers. buy a computer at cheap laptop computers. computer online and cheap new laptops. desktop laptop and laptop desktop at buy a pc shop. computer notebook and computer websites. mini desktop computer and cheap computer towers both are good. best place to buy a computer at computer supplies stores. desktop computer tower and gaming desktop computers at computer retailers. computer equipment and pc buy at computer kopen. refurbished desktop computers at laptop computer deals. refurbished notebooks and refurbished pc at cheap gaming computer. used computers for sale at cheap notebooks shop. pc tablet and best laptop computer. small desktop computer and used laptop for sale at desktop computer all in one store. laptop computer reviews and hardware computer. cheap refurbished laptops business computer is good. cheapest computer at toshiba computers and second hand computers. laptop notebook and custom built pc at portatile small computer at microsoft computers. new pc and custom computer are used pc. custom built computers and best buy pc at notebook pc. computer computer at sale. best place to buy computer at your facility. computer best buy and cheap computer parts tabletpc. all in one desktop pc is not very good. how much is a computer price cheap used laptops can be. used computer parts and custom gaming computer are expensive. how much does a computer cost if you build computer. online computer store are giving computer reviews. refurbished laptop computers are expensive. pc shopping and laptop parts for computer tablets can be purchased on online computer. computer outlet and computer wholesale at top pc. multimedia computer and notebook review is here.
Category
People & Blogs
How To Build Assemble a Computer Step by Step; 12 min.
AK Creativity
Published on Jul 12, 2017
How To Build Assemble a Computer Step by Step
Subscribe Our Youtube Channel - https://www.youtube.com/channel/UCy-q...
Things Required to Make -
1. Motherboard
2. SMPS
3. RAM
4. DVD DRIVE
5. HARDDRIVE
6. CABINET
7. SATA CABLE
8. SCREWS
How to Make or Assemble Desktop CPU Step by Step At Home | How to Build a Computer with used Parts; 12 min.
Technology Guide
Published on Dec 28, 2017
How to Assemble CPU Step by Step | How to Build a Computer in 10 Minutes
---------------------------------------------------------
Website:http://www.techmehub.com
http://www.circuitsarena.com
Category
Science & Technology
How to Make Mini PC at Home - Mini Computer; 6 min.
The Wrench
Published on Jul 29, 2018
Hi Friends, in this video im going to show you How To Make a Mini PC at Home.
Things You Will Need
Orange Pi Win Plus Development Board: https://goo.gl/WDr6n7
Power Supply Adapter: https://goo.gl/QXCxSd
10.1 inch 2K Display Monitor: https://goo.gl/atHuNu
Keyboard:https://goo.gl/SZFTX7
12v Adaptor
MDF Board
OS VIDEO LINK : https://youtu.be/34vhLn2PGXA
FRIENDS I HOPE YOU LIKE THIS VIDEO. THANKS FOR WATCHING HAVE A GOOD DAY
How to Make or Assemble Desktop CPU Step by Step At Home | How to Build a Computer with used Parts; 12 min.
Technology Guide
Published on Dec 28, 2017
How to Assemble CPU Step by Step | How to Build a Computer in 10 Minutes
---------------------------------------------------------
Website:http://www.techmehub.com
http://www.circuitsarena.com
Category
Science & Technology
How a motherboard is made: Inside the Gigabyte factory in Taiwan; 2:48 min.
PCWorld
Published on Jun 9, 2017
Gigabyte is one of the biggest motherboard makers in the world, and we visited the company's factory in Taiwan to find out how they're manufactured.
Follow PCWorld for all things PC!
How to make a Motherboard - A GIGABYTE Factory Tour Video; 11 min.
OverClocking-TV
Published on Jul 15, 2010
The motherboard in this video are part of the Ultra Durable series. Our current Z170 recommended motherboard from this series is the Z170 UD5 : http://amzn.to/2dlrqAJ
Check out our remastered version with a native english speaker : http://www.youtube.com/watch?v=5vWrEm...
[EN] Xyala and Trouffman explain how to make a motherboard from A to Z. This video shows exclusive footage on the production line of the GIGABYTE Factory in Nan-Ping, Taiwan. The process is similar for all manufacturers, but GIGABYTE is the only motherboard maker who still manufactures in Taiwan.
[FR] Xyala et Trouffman vous expliquerons comment fabriquer une carte mère de A à Z, la video montre des videos exclusives de la ligne de production de l'usine GIGABYTE à Nan-Ping. Le procédé est similaire pour tout les constructeurs.